Showing posts with label tutorial. Show all posts

Sexy and Smouldering Brown Smokey Eye


It's only recently that I've started to line my eyes as a whole, rather than just the outer 2/3. I used to think it closed them in, but actually now I think it gives them intensity. I also like how white it makes your eyes look.

What I used:-
  • Mac eyeshadow in Twinks
  • Urban Decay eyeshadow in Smog
  • Urban Decay Eyeshadow in Side Car
  • Urban Decay eyeshadow in Midnight Cowboy
  • Rimmel eyebrow pencil in 004 Black/Brown
  • Avon Supershock gel eyeliner pencil in Black
  • Max Factor False Lash Effect Fusion in Black
  • Mac Mineral Skin Finish in Medium Plus
  • Avon True Colour blush in Earthen Rose
  • Max Factor Vibrant Curve Effect lipgloss in Bubbly
  • 17 Sheer Moisture lipstick in Antique Lace
EYES:- Prime lids then cover them in Smog. Next, take Twinks and add to the outer corner and crease to add depth. Also, take it underneath the lower lash line, to about three quaters of the way along. Blend everything together. Add Side Car lightly on your brow bone to highlight, and Midnight Cowboy in the inner corner of your eye to add light. Then line your eyes with your eyeliner - upper lash line, then water line. When you line your upper lash line, leave it to set a while, then soften the line by smudging it slightly with a cotton bud. Then add a bit of eyeliner under the lower lash line, and blend it into the eyeshadow with a cotton bud as soon as you've applied it. Apply lashing of mascara to both upper lashes and lower lashes, then fill in your brows.

FACE:- Apply concealer or foundation if neccessary. I just used Mac MSF because I felt a bit lazy lol. Make sure your foundation isn't too matte, as it can make this look too 'done'. Add a warm blush on top of your cheekbones to make them stand out.

LIPS:- Apply a nice neutral lipstick, and cover with gloss. Think Kardashian! :)

Hope you liked it!

X

MAKEUP TUTORIAL - Belle

I've been really inspired lately, and have decided to do a makeup tutorial on theDisney Princess Belle


I drew inspiration from not only her famous yellow ball gown, but from her everyday blue dress as well. This is the reason I decided to colour the eyelid blue, rather than the standard yellow, adding the flash of gold on the waterline. I always see Belle as very elegant (probably because it is also set in France?) so I tried to put that across through the groomed brows and understated glossy lip.


What I used:-
  • UD Primer Potion
  • UD Shattered eyeshadow
  • UD Goddess eyeshadow
  • Avon Mousse eyeshadow in Pacific Pearl
  • UD 24/7 eyeliner in El Dorado
  • Max Factor False Lash Effect Fusion mascara
  • Rimmel Professional Eyebrow Pencil in 004 Black Brown
  • Benefit Thrrrob Blush
  • Eyeko lipgloss in Primrose Hill

EYES:- Prime lids, then using a light iridescent blue, cover your lid. Add a dark shimmery blue to the outer edges and blend. Highlight your browbone with a pale, pearlescent eyeshadow. Line your waterline with a gold eyeliner, but make sure it really pops. Coat your upper lashes with mascara and fill in your brows subtly.

FACE:- Add a flush of pink to the apples of your cheeks and blend upwards, towards your temple and hairline.

LIPS:- Slick a pink shimmery gloss over your lips.

Its quite a quick and simple look, but I think it does look striking, especiallly due to the flash of gold. Hope you like it!

X

MAKEUP TUTORIAL - Day to Night Makeup

So, in this tutorial I'm going to show you how to transform your simple, pretty day time makeup to an elegant, sophisticated night time look using just two products.

Day

Night


Products I used for this look:-
  • Max Factor Smoky Eye Effect Eyeshadow in Bronze Haze
  • Avon Perfect Wear Liquid Eyeliner in Evening Black
  • Max Factor False Lash Effect Fusion mascara in Black
  • Rimmel Professional Eyebrow Pencil in 004 Black Brown
  • Avon Plump Pout lipgloss in Lucious Mauve
 The two products you need to take with you to update your look:-
  • Eyeliner
  • Brow Pencil
Day
EYES:- Sweep the lighter champagne shade all over your lids, then softly define the eyes using the darker brown. Add a thin line of eyeliner on your upper lash line, but don't take it all the way down to the inner corner of the eye. Add mascara to your top lashes.

LIPS:- Add a slick of pretty pink lipgloss.

Night
EYES:- Use your eyeliner to thicken the line and add an elegant flick to wing it out. Then fill in your brows to create a nice arch.

LIPS:- If you need to, reapply your lipgloss.

It's as simple as that! Hope it helped!

xx


MAKEUP TUTORIAL - Adele/ 60's esque


 I love Adele, for her music, her hair, and of course her makeup. It's really elegant and pretty. I also think its very good as a modern 60's look, which is great as one of my friends is hosting a farewell party that is 60's themed!

What I used:-
  • Urban Decay Primer Potion
  • Maybelline eyeshadow quad in Designer Chocolates (I used the pale nude colour)
  • Avon glimmerstick eyeliner in Cosmic Brown
  • Mac eyeshadow in Twinks
  • Maybelline gel eyeliner in black
  • Max Factor Masterpiece Max mascara in Black
  • Vital Radiance Brow Defining Pencil in 06 Brunette
  • Estee Lauder Double Wear concealer in 01
  • Estee Lauder Double Wear foundation in 1C1 Shell
  • Benefit Georgia blush
  • Bourjois Delice de Poudre Bronzing Powder
  • Benefit Get Even powder in 01
  • Hanorah Satin Eyeshadow mono in 3 Opalescent (used as highlighter)
  • Avon Colourtrend Lip Stix in Romantic Rose
  • Estee Lauder High Gloss in 03 Honey
EYES:- As always, prime your lids first. Then sweep your pale nude eyeshadow all over your eyelid. Next take your brown eyeliner and draw a line on your lid that is visible when your eyes are open. You want it to follow the curve of your eye, then flick out at the end. Go over it with Twinks to soften the line, blending it out. Then line your upper lid with an eyeliner of your choice, I used gel because I find it easier to work with. Make sure the line is crisp and sharp, winging it out at the edges. Take your brown eyeliner then and line your lower lash line with it, smudging it slightly to make it look worn in. Add lashings of mascara and define your brows.

FACE:- Apply concealer to blemishes/undereye circles. Then take your foundation and apply it, making sure your thoroughly blend at the hair and jaw line. Dust your face with a powder to set the foundation. Add a peachy blush to the tops of your cheek bones, and add a bit of bronzer under them to contour. Blend them together seamlessly. Blend a highlighter to the tops of your cheekbones.

LIPS:- Smudge a soft pink lipstick onto your lips using your finger, and add a nude gloss on top to create a glossy, understated lip.

MAKEUP TUTORIAL - Dreamy Twilight Sky


The other day there was a beautiful sunset, with the sky marbled with soft pinks, lilacs, mauves and blues. It looked absolutely gorgeous and etheral, and inspired my makeup the next day when I went out with my friends.

What I used:-
  • Urban Decay Primer Potion
  • Avon mousse eyeshadow in Pacific Pearl 
  • UD eyeshadow in Grifter
  • UD eyeshadow in Shattered
  • Vital Radiance Brow Defining Pencil in 06 Brunette
  • Flase eyelashes
  • Benefit Thrrrob blush
  • Benefit Get Even! face powder
  • Barbra Daley lipgloss in Berry

 EYES:- As always, prime your lids first (I used Urban Decay Primer Potion). Next, take Pacific Pearl and add it to the inner corners of your eyes. Then add Grifter to the rest of your eye lid, taking the colour up to just underneath your brow bone so that you can see the colour when you open your eyes. Then use Shattered on the outer edges of your eye lid and in your socket to define your eyes. Make sure the two colours are well blended. Add some natural looking false eyelashes to your upper lid, making sure you get them as close to your lash line as possible, as there won't be a black line to help cover up mistakes. Brush your brows into place and define them.

FACE:- Use a powder in the place of foundation, or a light foundation without powder if you feel like you need a better coverage. You want it to look natural and fresh and not very 'done'. Add some pink blush to the apples of your cheeks, blending it upwards towards your temple. Highlight the tops of your cheek bones (I just used Pacific Pearl again).

LIPS:- Add a slick of gloss and you're good to go!

MAKEUP TUTORIAL - Club Tropicana


This is a look I did whilst on holiday, the night we decided to dress up in our hula gear. I wanted something that was fun and colourful, yet cute and girly. This is the look I came up with!
What I used:-
  • UD primer potion
  • UD eyeshadow in Honey (yellowy gold)
  • UD eyeshadow in Peace (bright blue)
  • UD eyeshadow in Graffiti (grass green)
  • UD eyeshadow in Ransom (purple)
  • UD eyeshadow in Fishnet (fuchsia)
  • Max Factor Masterpiece Max mascara
  • Benefit Moonbeam
  • Benefit Get Even in 01
  • Clarins bronzing powder in 20 Golden Sun
  • Max Factor lipstick in Bewitching Coral
EYES:- First off, as always, prime your eyelids. Then take Honey and apply into the inner corners of your eyes. Clean your brush and apply Peace to the next third of your eye lid. Then take Graffiti and apply it to the outer corner of your eye. Add Ransom just above it, in the crease of your eye and then blend everything together. If certain colours have lost some of their vibrancy, go over them a second time but remember to blend the edges. Next, take Fishnet and place it under the lower lash line, bringing it half way along the lower lash line. Finish with mascara.

FACE:- Add highlighter on the tops of your cheeck bones and powder to take away some shine.Take some bronzer and add to the places the sun hits naturally - cheeks, forehead, nose, chin.

LIPS:-  You only need a light flush of colour with this look, or it will be too much. Run your finger over the top of the bullet and rub onto lips to get a subtle flush of colour.

MAKEUP TUTORIAL - Golden Glitter


I once read a quote that stated "If it's not sparkly it's not pretty", and generally this is my philosophy ;). I always loved glitter eyeliners, its just that I never use them and I can't understand why. They're the epitome of glittery makeup, and look so stunning on. That's why in this makeup I decided to dig out my glitter liners and just use them alone on my eyes. I think it looks rather good :)

What I used:-
  • Collection 2000 Glam Crystals Dazzling gel liner in 3 Funk
  • Urban Decay Heavy Metal glitter eyeliner in Baked
  • Urban Decay Heavy Metal glitter eyeliner in Pyrotechnics
  • Rimmel Glam'Eyes Professional Liquid Liner in Black Glamour
  • Max Factor Masterpiece Max Mascara in Black
  • Rimmel Professional Eyebrow Pencil in 002 Hazel
  • MAC Studio Fix Fluid in NC15
  • Estee Lauder Double Wear Concealer in 01
  • Marks and Spencer Powder Blusher in Coral 
  • Topshop Velvet Finish Moisturising Lipstick in Infrared
EYES:- First off, take your gold glitter eyeliner and cover your entire lid in it. It might take a couple of coats, and you have to keep your eyes open so it doesn't cease. Once dry, take a bronze eyeliner and add definition to the outer edge of the eye, bringing the colour up and over the gold, in the crease of your eye. make sure you blend the colours together by gradiating them. To do this, dip the brush in the eyeliner pot and wipe the excess off, then pat it over the area where the bronze and gold meets to intermingle them. Then take a white glitter eyeliner and add it to the inner corner of your eye, making sure to blend it with the gold. Go over any areas that seem patchy and add black liquid liner to your upper lid, winging it our at the edges. You can use gel, but it gets stuck on the glitter, making it really hard to get a smooth line. Bring the black eyeliner into the inner corner of your eye, and line 1/3 of your lower lash line with it. Place a small dot of eyeliner just below the inner corner of your eye. Add more bronze glitter eyeliner to the outer edges of your lower lash line, and add lots of mascara to the top and bottom lashes. Fill in your brows.

SKIN:- Apply foundation on face, and conceal any blemishes and dark circles. Add a coral blusher to your cheeks, blending it up towards your temples.

LIPS:- Apply orange lipstick to your lips, blot and reapply.

Now go out and glitter!

MAKEUP TUTORIAL - Summer Blues


Look at those roots! Time to re-dye the hair I think! Ha!


 I really like this look, I think it looks quite summery, even though it uses darker cool colours. I think its the pop of green under the lower lash line that makes it! It easily can be put on in the day and worn with casual clothes, then at night all you have to do is change because this look is quite smouldering.

What I used:-
  • Mac Studio Fix foundation in N15 
  • Benefit Get Even in 01
  • Avon Smooth Mineral blush in Blushed
  • Urban Decay Primer Potion
  • Lime Crime eyeshadow in Mirror Mirror
  • Lime Crime eyeshadow in Twilight
  • Mac pigment in Landscape Green
  • Avon mousse eyeshadow in Pacific Pearl (used as highlighter)
  • Max Factor Masterpiece Max mascara in black
  • Max Factor kohl eyeliner in black
  • Natural Collection lipstick in Raspberry
EYES:- As always, prime your eyelids first. Then take a brush and cover your entire lid in Mirror Mirror. Wipe your brush clean and add Twilight to the outer corners of your eye, bringing the colour up so that when you have your eye open you can just see it. Blend everything together. Next, line your eyes with black eyeliner, taking it all the way around from the waterline on your lower lid to your lash line on your upper lid. Add Landscape Green to the outer corner of your lower lash line, only taking it a third of the way around. Add lots of mascara. Using your ring finger, add Pacific Pearl to the inner corner of your eye to brighten it up, and to your brow bone.

FACE:- Apply foundation, making sure to blend throughly at the hairline and jawline. Set with powder and add blush to the apples of your cheeks, sweeping it up towards the temples. Add highlighter to your cheek bones. Make sure everything's well blended.

LIPS:- Fill in lips with the lipstick, and blend with your finger to soften the colour.

MAKEUP TUTORIAL - Retro Glam


So this is the look I wore when I went to the class meal I  mentioned here. The image I had in mind as I was doing this was old school Hollywood glamour.

I used:-
  • Estee Lauder Double Wear concealer in Light
  • L'Oreal face powder in Soft Ivory
  • Bourjois chocolate bronzer
  • Urban Decay's Midnight Cowboy eyeshadow 
  • Urban Decay's Gridlock eyeshadow
  • Urban Decay's Primer Potion
  • Max Factor Masterpiece Max mascara in black
  • Maybelline gel liner in black
  • Benefits Thrrrob blush
  • Lime Crime lipstick in Retrofuturist
  • Red lip liner
  • Clear gloss.

 EYES:- Prime your lids first of all. Then take your pale beige eyeshadow and cover the whole of your eyelid in it. Take a taupe eyeshadow and contour the eye by pressing it into the crease of your eyelid.and along the top of your lashes so it forms a 'v' shape. Blend everything together. Take your black gel liner and line the tops of your lashes, winging it out at the sides to create a small cat eye. Depending on the look you want to go for, you can make the line thicker or thinner. Then add lots of mascara, and curl your lashes.

FACE:- First of all, conceal all the area's that you think need it, ie. the under eye bags, any blemishes, round the sides of your nose... just anywhere that you think will need a little camouflage. Then go over your whole face with the powder. Contour your cheeks with a bronzer, and add a little bit of blush to the apples of your cheeks.

LIPS:- Start by lining your lips. Then fill the outline in carefully with red lipstick using a lip brush, then blot and reapply. Finally, coat the lipstick in a clear gloss and you're good to go!

MAKEUP TUTORIAL - Jennifer Lopez

So this is my first of the week's tutorials! Do you like the sneaky way I put in a clue to my first tutorial in my last post? :P (It was bad, I know)


So, this make up is from her new video with Pitbull, for On the Floor. I really like it because I do love a smokey eye, and I like the highlight at the corner of her eyes - it makes them look amazing! 

 First off, I thought I'd post a before picture! How awful do I look! LOL


Products I used:-
  • Urban Decay Primer Potion
  • Estee Lauder Colour Intensity Eyeshadow in Twilight (a medium brown)
  • The darkest brown in my Accessorize Eye Wardrobe palette (might be Rich Earth - I need to check in the shops!)
  • The white eyeshadow in Avon's Smokey Eyes quad
  • Max Factor Masterpiece Max Mascara in Black
  • Avon SuperShock gel eyeliner in Black
  • Estee Lauder Double Wear Conclealer in 01
  • L'Oreal True Match foundation in N1 Soft Ivory
  • Benefit's Thrrrob Blush
  • Bourjois Declice de Poudre Bronzing Powder (the chocolate one ^-~)
  • Elizabeth Arden lipgloss in Bohemian Bronze
  • Jemma Kid Make Up School lipgloss in Rose
EYES:- Prime the whole of your eyelids. Then, take your medium brown eyeshadow and apply all over your lids, leaving a small gap in the inner corner of your eye, which is where the white eyeshadow goes. When applying the white eyeshadow, make sure you bring it just below the eye, not just in the corner then up. Next, take your dark brown and conture your eye - place in the socket of you eye and along the top of the outer corner, so there is a 'v' shape at the edge of your eye. Drag the colour out from the eye towards the temple, and blend everything together. Take a black eyeliner and line the top of your eyes and the bottom (only bringing it about 3/4 of the way along, just before your eyelashes end). If you want to add false eyelashes, do it now. Coat top and bottom lashes in mascara.


FACE:- Add concealer under your eye, but don't go over your eye make up. Blend. Then apply foundation to your face. Let it set for a minute, then contour your face by applying bronzer to the hollows of your cheeks. Blend out so it isn't a harsh line, and add a bit of pink blusher to the tops of your cheeks, just above the bronzer. Again, blend.

LIPS:- Apply the bronze lipgloss then go over with the pink one.

Voila!

 Do you think it looks better with hair up or hair down?

MAKEUP TUTORIAL - Corpse Bride

Sorry for the bad pictures - click on them to enlarge :(
This is the makeup I wore to my friends 18th, which was on HALLOWEEN last year and was NOT fancy dress. Strange, I know, so I decided to give a nod to the occassion with this makeup. It was inspired by the makeup in the previous post.

I used:-
  • a black eyeshadow (sparingly so it looked like a dark grey), 
  • a light grey eyeshadow, 
  • a gold eyeshadow, 
  • a white eyeshadow, 
  • black eyeliner (Avon SuperShock gel), 
  • white eyeliner (Rimmel), 
  • a white eyeshadow with shimmery flecks in it (that came up gold), 
  • black mascara(Max Fatcor Masterpiece Max), 
  • foundation (Estee Lauder Double Wear), 
  • pink blusher (Benefits Thrrrob), 
  • pressed powder, 
  • pink lipstick (My Treat). 
I can't remember the makes/ colours of some of the products I used in this look, so I've just given the colours that you need and when I could remember, I've stated. :)
EYES:- First of all, prime your eyes. Then take a silver/ light grey eyeshadow and go over your whole eyelid with it. Next, take a dark grey/ black eyeshadow and contour your eyes by pushing it into the crease in your eyelid, and blending it up to the brow bone and underneath the outer corner of your eye, about 2/3 of the way along. Bring the same black colour all the way to the bridge of your nose and down the sides of your nose slightly, so that it comes just below your eye. If you have natural under eye bags that are quite visible like mine, kind of aim towards them. Blend out the colour. Then take the gold eyeshadow and add it to the corners of your eye, and below it, dot some shimmery white eyeshadow. Blend again. Add some white eyeliner to your waterline, making sure it is the same length as the black eyeshadow underneath your eye. Then take a black eyeliner and line the last 1/3 of your eye in the inner corner. Also line the upper inner corner of your eye up to where your eye lashes start. Go over the silver to make it bright. Add a few coats of mascara to the top and bottom lashes. Check the eyeshadow is well blended.

FACE:- Apply foundation and concealer. Set with a powder. Apply a pink blush to the apples of your cheeks in a dotting motion to make the colour a circle of pink on each cheek. Take a white eyeshadow with a shimmering undercolour (mine was a white eyeshadow that had shon gold in certain lights) and add a line down each cheek like a tear line.

LIPS:- Use a pink lipstick or lipstain to draw a love heart in the center of your lips. Then take the gold eyeshadow and add a bit above your cupids bow, like a highlight. Slick gloss over your lips.

MAKEUP TUTORIAL - Camel nudes


This is a look that is inspired by the fashion trend of wearing the colour camel. It features nice bronze/ nude colours, so is a great day to night look. 
The products I used were:-
  • Estee Lauder Double Wear foundation in 1C1 Shell,
  • Avon True Colour eyeshadow mono in Nude, 
  • Estee Lauder Colour intensity eyeshadow in Hazelnut and Twilight, 
  • Max Factor Masterpiece Max mascara, 
  • L'Oreal Bare Naturale powder in 408 Soft Ivory, 
  • Bourjois Delice de Poudre bronzing powder, 
  • Estee Lauder High Gloss in 03 Honey  
  • Vital Radiance Brow Defining Pencil in 06 Brunette. 
EYES:- First of all, prime your eyelids. Then take a medium nude and brush all over your eyelids, bringing it slightly above your crease, so when your eyes are open, you can just see the colour peaking out. Next, take a medium to dark brown, preferably matte, and place at the outer corner of your eye, and bring it in until it covers the last third of your eyelid. Sweep the brown into the crease of your eye, taking it slightly beyond the brown so it goes just beyond the one third line. Make sure you can see the brown colour when you have your eyes open by bringing it slightly above the crease in your eye, like before. Finally, blend everything together, add a pale nude to the inner corners of your eyes and finish with mascara - don't be afraid to add quite a bit because I think your eyes need defining as you're using fairly washed out colours.

SKIN:- Apply your foundation. This time, I used a brush because I wanted to make sure that it was seemless - you want it to look like you have flawless skin, so don't skim over this step. Once your foundations into place, wait for a minute then go over it with a powder to set it. Then you need to take an angled brush (or a normal one - an angled one is more precise) suck your cheeks in and brush the bronzer onto the hollows of your cheeks (I try and place the bronzer a little above them actually, because I think it makes my cheek bones look more defined than when I put it in the hollows). Next, take the powder that you used to set your foundation and go over the bronzer with it do that you can see the colour, but its not in a defined line. You need to soften it.

EYEBROWS:- Don't do these until after you have done your foundation in case it goes on your eyebrows and turns them white! Brush your brows into place and then basically colour them in. Make sure the shape is quite strong to balance out the pale makeup and add definition to your face. 

LIPS:- Just slick a nude or brown gloss on, and you're good to go!

MAKEUP TUTORIAL - Wuthering Heights


This is my first makeup tutorial, and it is inspired by the book Wuthering Heights by Emily Bronte. 
In it I used:-
  • Eyeshadows from an Accessorize palette I got for Christmas, 
  • Max Factor Masterpiece Max mascara, 
  • Avon Super Shock Gel eyeliner, 
  • Max Factor Lipfinity Lasting Lip Tint in 06, 
  • Molton Brown lipgloss in Sleigh Ride, 
  • Urban Decay Primer Potion, 
  • Maybelline 24 Hour Super Stay foundation in 005 Light Beige, 
  • Hanorah Satin eyeshadow mono in opalescent (as a highlighter), 
  • BeneFit Thrrrob blush, 
  • Avon Ideal Shade powder in Fair.

Before you do anything, make sure your skin is clean and well moisturised. :)

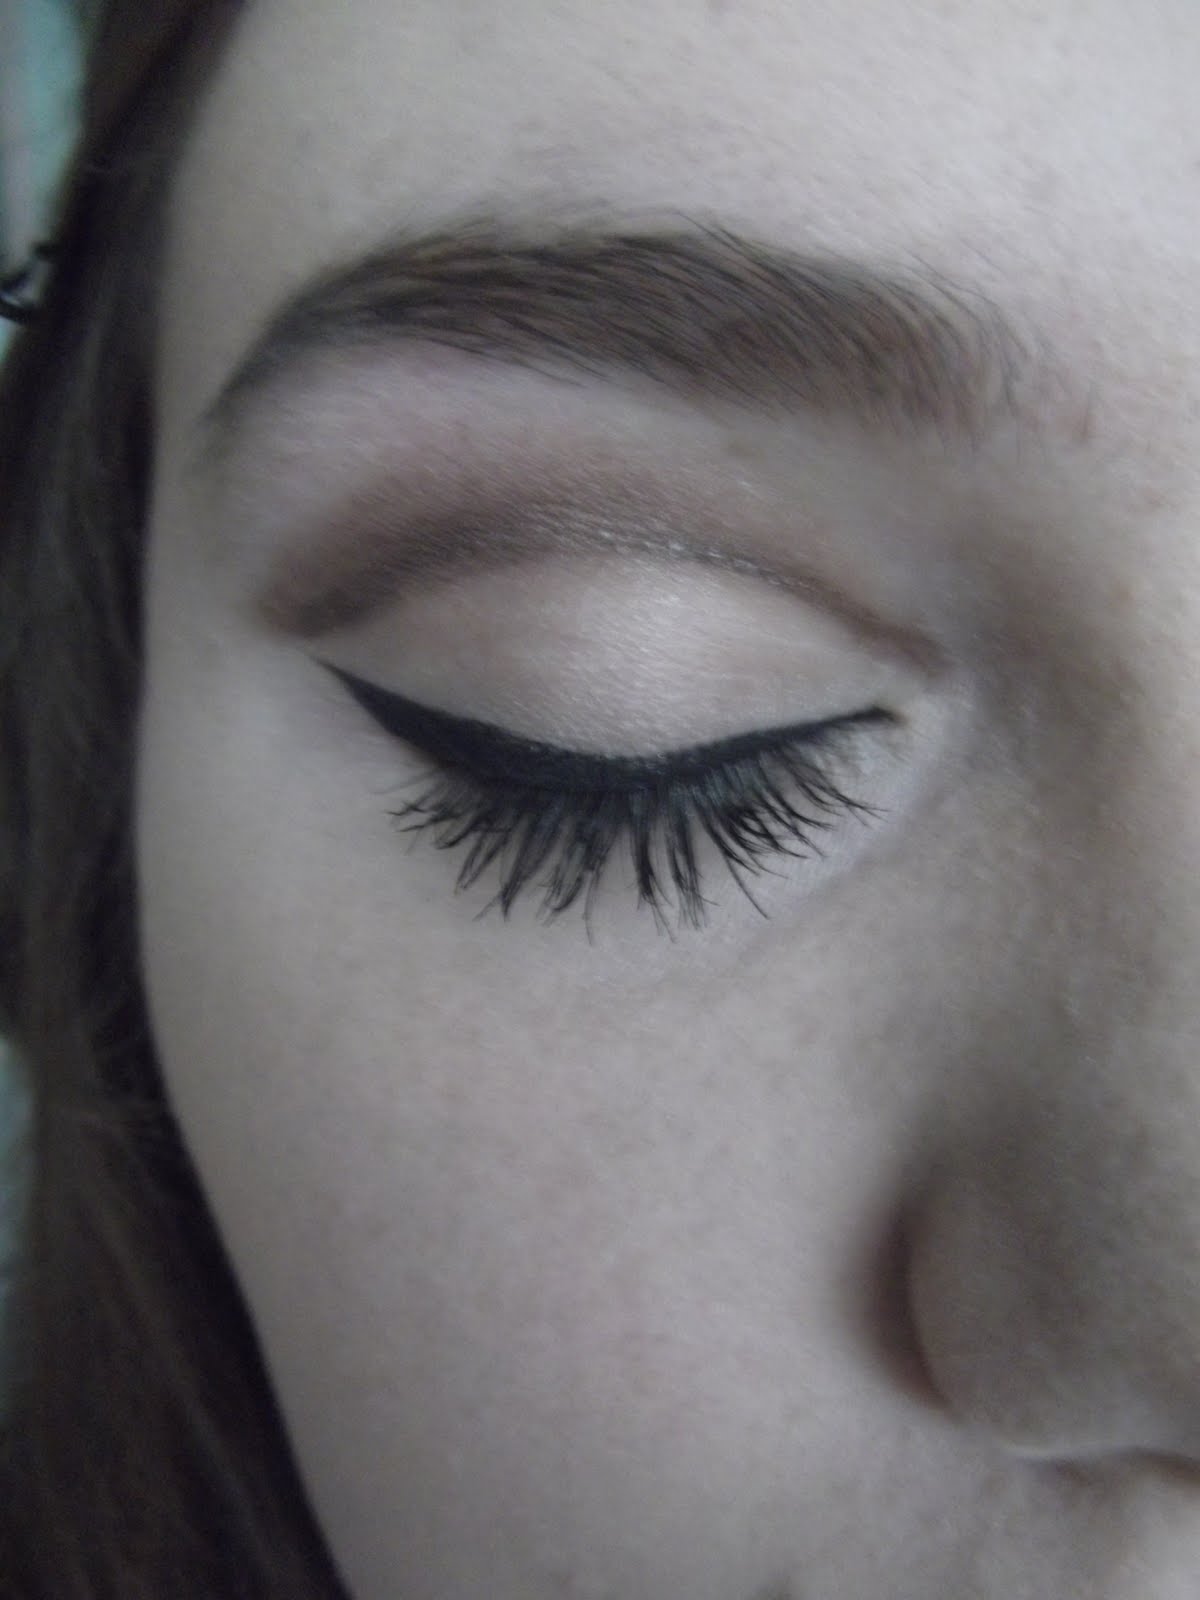
EYES:- I always start with my eyes first, in case any of the eyeshadow drops onto the tops of my cheeks or whatever - if you do your foundation first, you'll ruin it! First of all, prime your eyelids. I use Urban Decay's Eyeshadow Primer Potion, but I would like to have a go of Lime Crime's one. Once you have primed both eyelids, I used a pale, shimmery salmony pink in the corners of my eyes. Sweep it up to your eyebrows in an arching movement, and about one third the way across your eyelid. Then take a bright iridescent purple and cover the rest of your eyelid with it, taking it up to just under your eyebrows. Blend with the pink. Next, take a teal colour, and place it at the outer corner of your eye and blend outwards. Create a v shape at the edge of your eye with the teal, but make sure its not harsh by blending it with a fluffy brush - don't press hard, just softly go over it in light circular movements. Remember, harsh lines are an indicator of a makeup novice, and you want it to look professional. Lastly, take a dark eggplant purple, and blend it into the socket crease, just above your eyeball. This sounds disgusting, but if you see were the top of your eyeball is, and run the brush along that ridge, that's were it needs to be. Blend, and then add the same eggplant colour to divide between the vivid purple and the pink. Once you've done this, touch up any colours that you think need to be brighter, then add some mascara to the top lashes and eyeliner to the waterline of your bottom lashes.

SKIN:- Put your foundation on. I generally do it with my fingers, but make sure you blend everything well, especially around the jaw, hairline and ears. Let it rest for a minute. Then take a power and set your foundation by covering your whole face, using a large soft brush. Next, take a highlighter (I use an eyeshadow because I perfer powders) and sweep it over the tops of your cheekbones, from your temples to just after the edge of your eye. Finally, take your blusher and brush it from the apples of your cheeks up to your hairline in an almost slashing motion. Blend, so you don't get a harsh line.

LIPS:- Take a lip tint and put it on your lips, concentrating the colour on the center of both your top and bottom lip. once it has dried, go over with a clear gloss.